Wednesday, July 31, 2024

Add Steven Slate Drums To A New Track In Pro Tools

By TOM BOWSER

Did you download and install Steven Slate Drums (SSD or SSD FREE) ? Not sure what to do next?

  1. Create a new stereo "Instrument" track. Press and hold down the CTRL + SHIFT keys then press the n key on your keyboard.
    1. Left click on the down arrow to the right of "new" then left click on "Stereo" to choose it. See image below.
    2. Left click on the next down arrow and left click on "Instrument Track" in the menu to choose it.
    3. Left click on the "Create" button.
    4. Rename the track to "SSD" (double left click the name).
Create New Stereo Instrument Track In Pro Tools
  1. Left click on the "Edit Window View" selector. I've drawn a red line around it in the image below.
Edit Window View Selector In Pro Tools
  1. Hover over the menu that appears and left click on the word "Instrument" to add a check mark to the left of it.
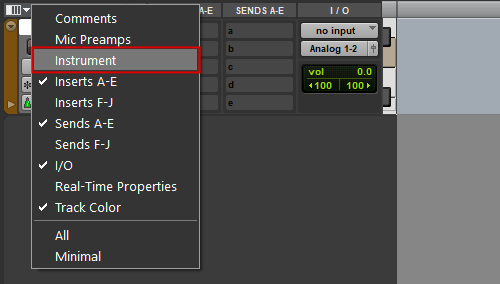
An Instrument track view is added to the track that provides controls for MIDI input, output, mute, volume, and pan.

An Instrument Track Showing The Instrument View In Pro Tools

Insert The SSD Plug-in On The Instrument Track:

  1. Left click on the top "INSERT" (insert A) of the new instrument track. An insert looks like a blank rectangular space with a black dot in the upper left hand corner. The small black dot is called the "insert selector". I've drawn a red line around insert A in the image below.
Insert Selector On An Instrument Track In Pro Tools
  1. Hover your mouse cursor over the words "multichannel plug-in on the menu.
  2. Hover over "Steven Slate" on the next menu that appears.
  3. Left click on "SSDSampler (stereo)".

The SSD plug-in window should open. If it does not open left click on the SSD plug-in "insert button" that now populates the track insert. I've drawn a red line around the SSD plug-in insert button in the image below.

Insert Button On An Instrument Track In Pro Tools

TEST The SSD Plug-in:

I'm using SSD FREE as my reference for the following instructions.

  1. Double left click on the top most title under the "KIT PRESET" heading of the SSD plug-in window. I've drawn a red line around what I'm referring to in the image below. The drum instruments for the kit will load.
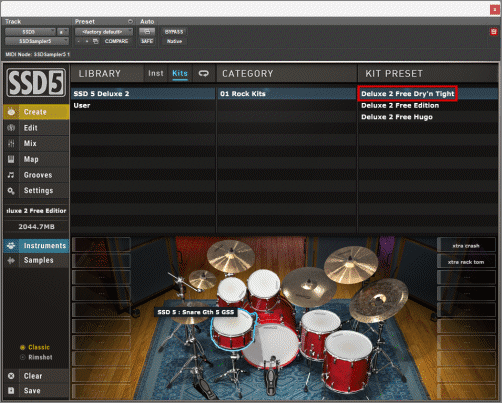
Steven Slate Drums Plug-in Window
  1. Left click on any drum or cymbal within the virtual drum set at the bottom of the SSD plug-in window. You should hear the sound of the drum or cymbal you click on.

Monday, July 29, 2024

Create MIDI Tracks From Recorded Drum Tracks

By TOM BOWSER

The following steps demonstrate how to use Steven Slate Trigger to create a MIDI drum track from an audio drum track. The MIDI drum track can then be used to trigger drum samples in some virtual drum plugins.

You will need a copy of Steven Slate Trigger to work through this tutorial. You can purchase a copy of TRIGGER at Steven Slate Drums. Unfortunately, the FREE version of TRIGGER will not work for this tutorial. The MIDI capture feature used in this tutorial is disabled on it.

Review my tutorial Slate Trigger 2 - Getting Started if you're new to using Trigger.

  1. Insert Trigger on the audio drum track you want to convert to MIDI. For this tutorial I use an audio kick drum track.
Kick Drum Audio Track In Avid Pro Tools
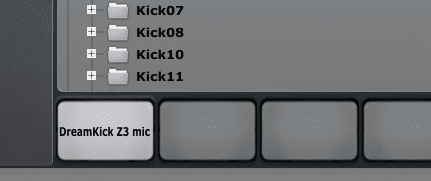
  1. Load an "Instrument" into Trigger. For this tutorial I chose a kick drum instrument. See the image below.
Picture Of Currently loaded Instrument (Drum Sample) Loaded Into Steven Slate Trigger
  1. Optimize the triggering settings of the Slate Trigger plug-in inserted on the audio drum track. If Trigger does not detect a hit it will not convert it to MIDI. You will have missing drum hits in the MIDI track Trigger creates.
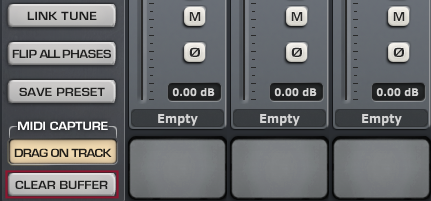
  1. Left click on the "CLEAR BUFFER" button at the bottom left hand side of the Trigger Plug-in. I've drawn a red line around the CLEAR BUFFER button in the image below.
Steven Slate Trigger Clear MIDI Buffer Button
  1. Left click on the "Return to Zero" button in the Pro Tools transport window to move the playback cursor to the beginning of the track.
Pro Tools Transport Window With Return To Zero Button
  1. Press your keyboards spacebar or left click on the green play button (green triangle) of the Pro Tools transport window to begin converting the audio track to MIDI.
  1. Press the spacebar on your keyboard to stop the Pro Tools playback cursor when it has reached the end of the audio track. You can also left click on the square "Stop" button on the transport to stop playback.
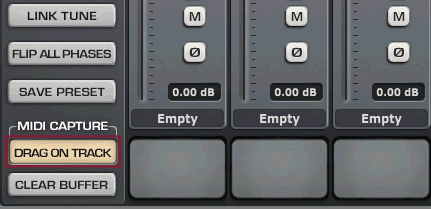
  1. Left click and hold down your left mouse button on the "DRAG ON TRACK" button at the bottom left corner of the Trigger window.
Steven Slate Trigger Drag On Track Button
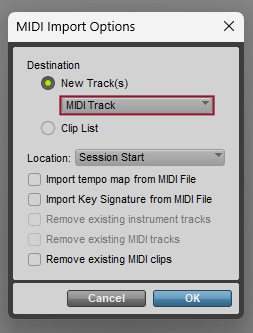
  1. Drag your mouse cursor onto a blank section of the "Edit Window" then release your left mouse button. The "MIDI Import Options" window will appear.
MIDI Import Options Window
  1. Left click on the drop down arrow under "Destination > New Track(s)" and select "MIDI track". (see the above image)
  2. Left click on the "OK" button.

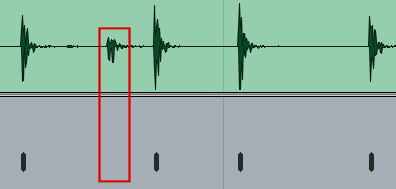
A new MIDI track is created. It will display a series of black verticle lines. Each black verticle line in the MIDI track should correspond to a drum hit in the original drum track (kick drum track in this tutorial). (see the image below).

Kick Drum Audio Track And Kick Drum MIDI Track In Avid Pro Tools
  1. Review the new MIDI drum track and verify that it includes a black verticle line for each drum hit in the audio track.
  2. Name the new MIDI track. For example, "Kick MIDI".

NOTE: As I mentioned in Step 2, you need to optimize the triggering settings of the Slate Trigger plug-in BEFORE converting to MIDI. If you do not you may have extra or missing drum hits in your MIDI track. In the image above, I've drawn a red line around a kick drum hit that was not detected in the audio track and not written to the MIDI track.

Tuesday, February 6, 2024

Set Pre or Post Fader Metering

By TOM BOWSER

Pro Tools is set to use pre-fader metering by default. You know Pro Tools is set to pre-fader metering if you move a volume fader up or down and the level shown by the meter does not change.

To set either pre or post fader metering:

  1. Left click on "Options" on the Pro Tools menu bar.
  • If "Pre-Fader Metering" has a checkmark to the left then pre fader metering is being used in the session. See the image below.
  • If there is no checkmark then "Post-Fader Metering" is used in the session.

Pre (before) Fader Metering: The meter shows the level of the audio signal BEFORE it passes the volume fader. If you move the volume fader up or down the signal level the meter displays will remain the same.

Post Fader Metering: The meter shows the audio signal after it has passed through plug-ins inserted on the track and after the volume fader.

If you move the volume fader higher the signal level the meter displays will increase. If you move the volume fader lower the signal level the meter displays will decrease.

Typically, pre-fader metering is used during recording to set levels coming into your DAW and post fader metering is used when mixing.

Whether you use pre or post fader metering while mixing is a matter of preference. I like to view a new mix using pre-fader metering to verify that all track levels are where I expect them to be, no signal is too high or low.

Generally, once I begin to mix a session I switch to post fader metering for the rest of the time I spend mixing.