By TOM BOWSER
How To Change The Color of a Marker
Markers can help you navigate a Pro Tools session. Use a "marker" to indicate a songs intro, verse, chorus or solo. Use a marker to Indicate something in the session you want to change, edit or review.
Learn more about "Markers" in Pro Tools by working through my tutorial "Markers - Using, Creating, Deleting, Renaming".
Marker colors are disabled by default. In the following directions I assume you have already created one or more markers.
Enable marker colors:
- Left click on Setup > Preferences on the Pro Tools menu bar.
- Left click on the Display tab.
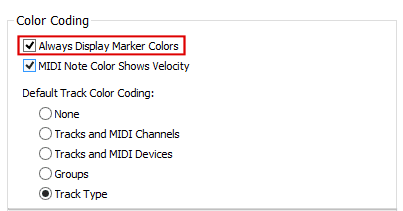
- In the Section labeled "Color Coding":
- Left click in the box next to "Always Display Marker Colors".
- Left click on the "OK" button (bottom right side of the window) to save your changes.

To change the color of a Marker:
- Double left click on a tracks "color bar" to open the Color Palette Window. Color bars are located at the top and bottom of each track in the Mix window and at the left of each track in the Edit window. I've drawn a red line around a tracks color bar in the image below.

- Left click on the drop down arrow of the Color Palette Window and choose "Markers". I outlined the drop down arrow in red in the image below.

- Left click on a marker in the Marker ruler. I've drawn a red line around a marker in the image below. It is the yellow triangle with the text "INTRO" to the right of it.

- Left click on a color in the Color Palette to choose it. I've chosen blue for the marker in the image below.

