By TOM BOWSER
I demonstrate different ways of enabling plug-in automation in Pro Tools.
Enable automation on every plug-in by default:
- Left click on "Setup" then "Preferences…" on the Pro Tools menu bar.
- Left click on the "Mixing" tab.
- Left click in the checkbox to the left of "Plug-in Controls Default to Auto Enabled". This preference is located in the "Automation" section of the Mixing tab.
Automation will be enabled for the controls of every plug-in that can be automated beginning at the point in time you enabled this preference.
Enable automation of a single plug-in control:
- Press and hold down the Ctrl, Windows and Alt keys on your keyboard.
- Left click on the plug-in control/knob you want to automate.
- Left click on Enable Automation for "(your plug-in control name)". See the image below. Automation is now enabled for the control.

Left clicking on "Open plug-in Automation Dialog…." opens the Plug-in Automation window. You can enable the automation of available controls for any plug-in inserted on the track.
Use the plug-in Automation Enable button:
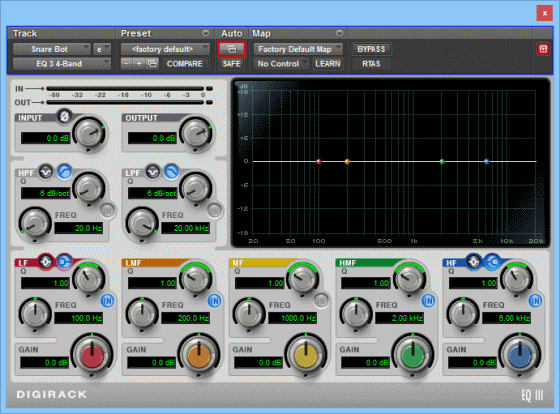
- Left click on the plug-in "Automation Enable" button (outlined in red within the image below).

- Left click on the plug-in control you want to automate from the list on the left hand side of the Plug-in Automation window.

- Left click on the "Add >>" button in the center of the Plug-in Automation window (outlined in red in the image above). The plug-in control description will move to the right hand side of the Plug-in Automation window.
TIP: With the Plug-in Automation window open you can choose to automate the plug-in controls of any other plug-in inserted on the track. Left click in the radio button to the left of a plug-in name listed under "Inserts". The Pro Tools Plug-in Automation window will change to show the controls that can be automated for the plug-in you selected.
- Left click on the "OK" button to save your selection/s.
